Windows Wednesdays – Keeping Your Favorite Apps Closer, Part 3

Last post in this “Keeping Your Favorite Apps Closer” sub-series, I promise, and today’s installment will be short. The last place for keeping your frequently-used apps close at hand (not counting programs that have a part that keeps running in the background and leaves a mini-icon in the Taskbar Notification Area) is the Desktop. And adding icons to the Windows 11 Desktop is pretty much the same as adding icons to the Desktop in previous versions of Windows, most notably Windows 10.

The main thing to remember about adding icons to the Desktop is that, for the most part, you want to create shortcuts to the programs you want, not move the icons or program executables there. The reason I mention this is that the most intuitive way to put an icon on the Desktop is to drag and drop it there. But in this case, that’s exactly what you don’t want to do. That’s because unless you’re familiar with the nuances of Windows’ drag-and-drop behavior, you may not realize that when you drag and drop something from one folder to another on the same drive, Windows moves the item. When you drag and drop from one drive to a different drive, Windows copies the item. Personally, I was never very good at remembering this subtlety, but I learned a long time ago (back when Windows XP was the most popular operating system, I think) that if you drag and drop using the right mouse button instead of the left, then Windows pops up a context menu at the destination, and that menu asks you explicitly what you want Windows to do with whatever you just dragged and dropped.

Windows offers multiple ways to do most things, and copying, moving and creating shortcuts in File Explorer are among them, so it may not surprise you to learn that you don’t have to drag and drop with the right mouse button to accomplish what we’re after today. If you hold down the [Ctrl] key while dragging and dropping with your left mouse button, Windows copies the item. Hold down the [Shift] key while dragging and dropping with your left mouse button, it moves the file. And if you hold down the [Alt] key while doing this, it creates a shortcut at the destination. Intuitive enough for you? Me, neither! That’s why we’ll be dragging and dropping with the right mouse button.

(If you’re one of the few, proud, enlightened left-handed Windows users who learned how to set Windows to reverse your mouse buttons, then you normally click and drag with your right mouse button, and you’ll need to remember to use your left mouse button for this exercise.)

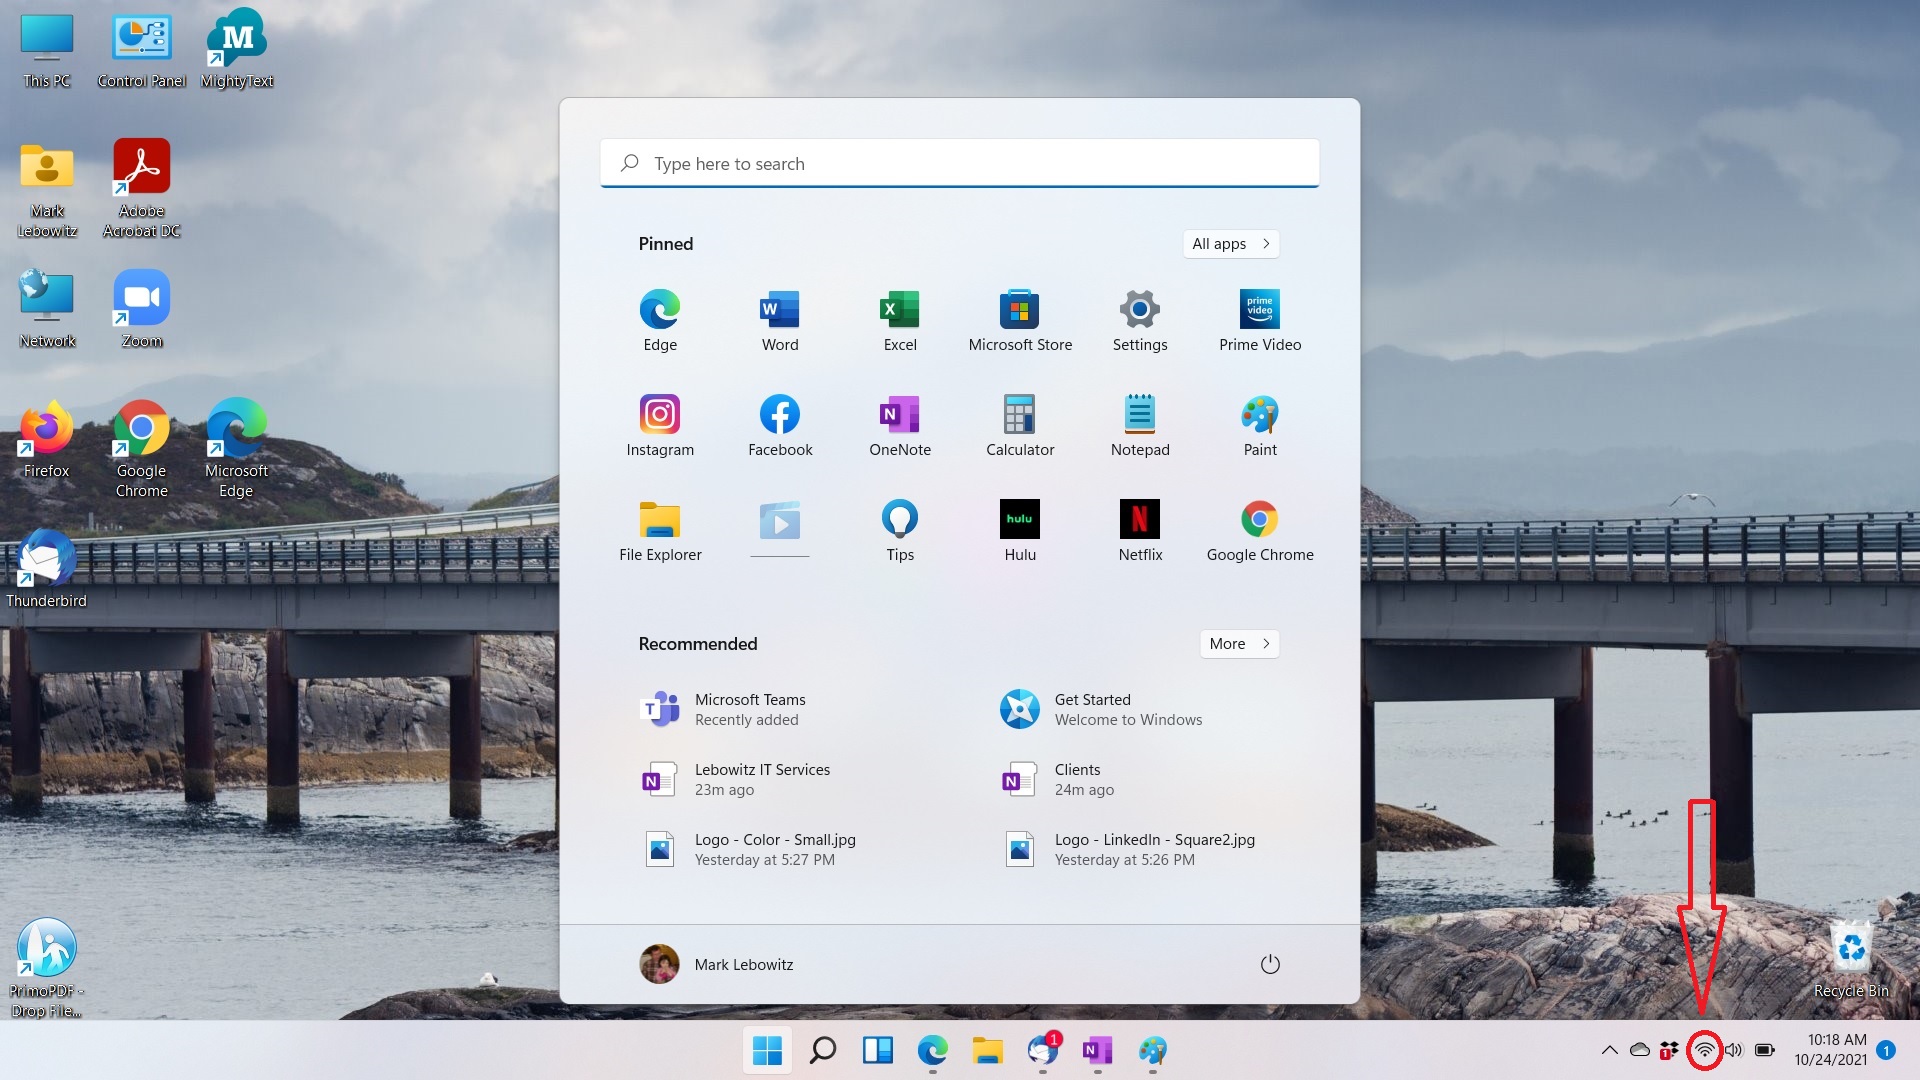
So, let’s get started. The most logical place to look for a program you might want to access from the Desktop is the All apps menu. (Why? Because if you’re sophisticated enough to be running “portable” software from your Downloads or some other folder, then you probably aren’t reading my blog.) So let’s click the Start button and go there:

Next, we click on the “All apps” button (circled), and then go look for something we want on the Desktop. It would be nice to have a shortcut to my printer manual on the Desktop, so let’s right-click on that:

That opens a File Explorer window with the shortcut I want to have on the Desktop. The window may contain multiple program shortcuts; in this case, it contains only one. Now, right-click and hold on the program shortcut you want to copy to the Desktop, drag it out of the window, and drop it on the Desktop as indicated by the arrow:

As shown in the picture, a context menu will appear. Left-click on “Create shortcuts here” (circled). Voila, you now have a Desktop shortcut to the program you want, and you may close the File Explorer window.

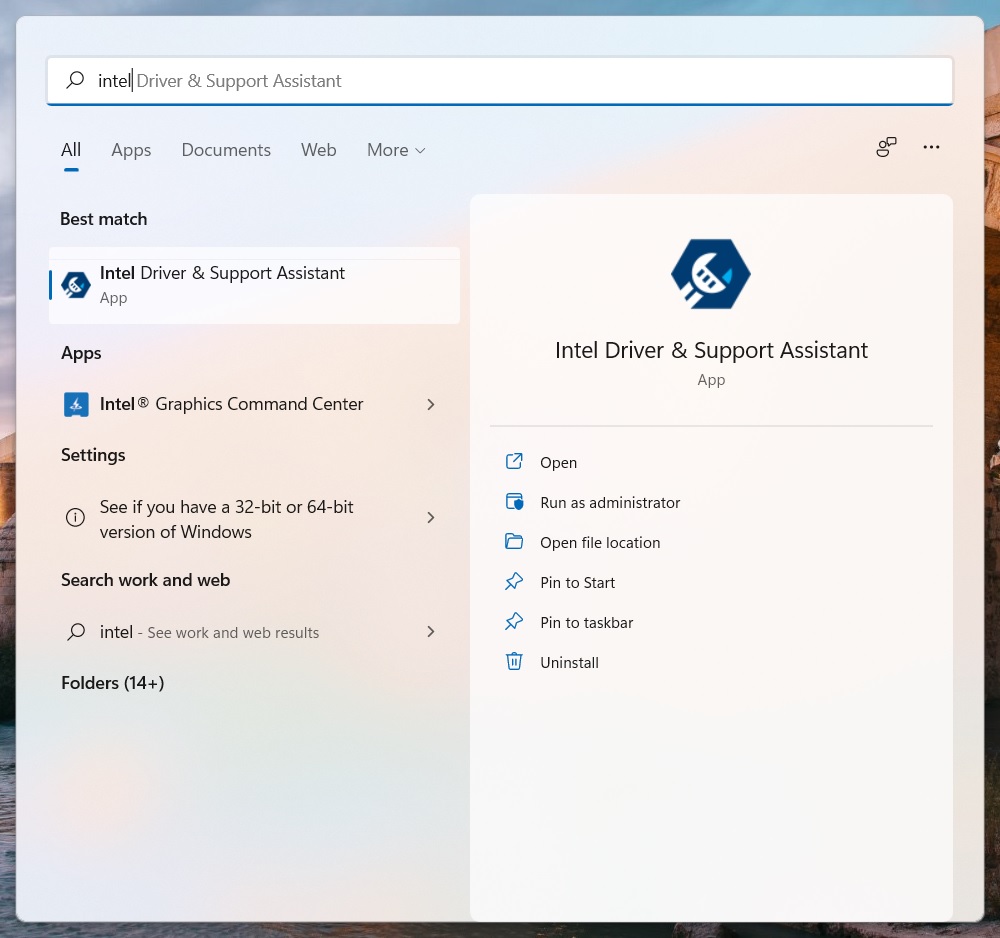
It’s even easier to do this from Start Menu search results, because “Open file location” is in the context menu when you right-click on the item in the search results.

But wait… what if you right-click on an item, but you see an unfamiliar context menu that lacks “Open file location”?

If that happens, it means you’ve clicked on an app that came from the Microsoft Store, what I often refer to as a Windows 11 Sandbox App. (in my case, I right-clicked on “AudioDirector for MSI”.) You can’t create a conventional Desktop shortcut from those because they aren’t run from executable files or shortcuts in File Explorer windows. There is a way to get such apps on the Desktop, but that involves looking up long, arcane strings of gobbledygook, then right-clicking on the Desktop, choosing “New”, then “Shortcut”, and keying them into the Create Shortcut dialog box. That is beyond the scope of this blog entry.

I hope this helps make your programs more convenient to access. Next week, we’ll move on to something completely different.

Windows Wednesdays – Keeping Your Favorite Apps Closer, Part 2

Start Menu Pinned Section

Last week, we saw how to pin program icons to the Taskbar. This week, we will have a closer look at the improved Start Menu.

In Windows 11, as in Windows 10, the Taskbar is “prime real estate”. In fact, it’s the most valuable prime real estate, since it displays key controls, like the Start button, clock and network status, pinned program icons and icons for programs that are running. Taskbar behavior in Windows 11 is somewhat more intelligent than in Windows 10, at least to a point. In Windows 10, an overloaded Taskbar used to spawn a second, hidden tier with an up/down arrow control to the right for switching between tiers. It was a usable solution, but a bit clumsy. In Windows 11, the Taskbar decreases the size of the icons as you open more programs. When there are too many icons to display at once, the Taskbar sprouts a vertical separator line, like this:

The separator line is indicated by the red oval.

It’s not clear to me, as of this writing, how to access the overflow icons on the right side of the separator. However, the Taskbar’s usability is effectively negated long before the vertical line appears. By the time you have a dozen programs running, the Taskbar is essentially just a long, unsorted list, and it’s too difficult to recognize the reduced-size icon of any program you might be looking for. At that point, it’s easier to use another method of task switching, such as [Alt][Tab], to switch between programs. So, it’s best to only pin your most frequently used icons. For most people, that’s just three or four. But what about the icons for your not-so-frequently used, but still favorite applications?

The most logical place to put those icons is the Start Menu. Microsoft greatly simplified the Start menu in Windows 11. In Windows 10, pinning icons to the Start Menu was something of a free-for-all. You could pin as many as you wanted and move them around, and there was even a way to organize them into sections. But moving and organizing icons in the Windows 10 Start Menu was cumbersome and unintuitive, so most users never learned how to do it. In Windows 11, the Start Menu has just two sections: a Pinned section and a Recommended section. For today, we will focus our attention on the Pinned section.

The Pinned section of the Windows 11 Start Menu can display up to 18 icons at a time. You can pin more, but if you do, then your Pinned section will grow additional panels: a second one when you pin the 19th icon, a third one when you pin the 37th icon, and so on. You’ll be able to navigate among the panels using a series of vertical dots, an up arrow and a down arrow to the right of the icons, similar to how the home screens on a smartphone work. But I’m not going to show you this, at least not now, because having that many icons on the Start Menu detracts from its convenience. Besides that, few people have that many favorite applications, so 18 icons are more than enough.

You can also unpin icons from the Pinned section of the Start Menu, and you can drag and drop icons to rearrange them to your liking. Let’s see how this works.

As of this writing, my Start Menu looks like this:

First, let’s remove a couple of unused icons. I don’t use the Facebook app, and I’ve never used the Windows Tips app. So, I right-click on Facebook, and click “Unpin from Start”, as shown:

Repeat this for the Tips icon, and now my Start Menu looks like this:

Next, I’ll pin a new icon to my Start Menu. I use Firefox frequently (along with Microsoft Edge and Google Chrome), so it would be nice to have it closer at hand. Pinning an icon to the Start Menu is very easy in Windows 11, because when you right-click on any program icon in Windows 11, no matter where or how you found it (in the Taskbar, search results, the All Apps list, the Desktop or File Explorer), the context menu includes “Pin to Start”. So, I’ll search for Firefox, right-click on it and click “Pin to Start”:

Almost done! My Start Menu now looks like this:

But it would be nice to have all my web browsers grouped together. This is also quite easy, as it’s just a couple of simple drag-and-drop operations. I start by clicking and holding (with the left mouse button) on the Firefox icon, and dragging it next to Edge, as shown:

The other icons obligingly shift to the right to make room, and when I release the left mouse button, the Firefox icon drops right where I want it, next to Edge. After I repeat this for Google Chrome, my Start Menu looks like this:

Now it’s your turn. Try unpinning icons you don’t need, pinning icons you want to get to more quickly, and rearranging icons on your Start Menu to see how much better you can make the menu work for you!

Windows Wednesdays – Keeping Your Favorite Apps Closer, Part 1

Start Menu Pinned Section

Everyone who has used Windows for awhile knows how to keep your most frequently used programs close at hand: just create a desktop shortcut for that program, of course. But what if you’re one of those desktop packrats whose Windows desktop is an unsorted, edge-to-edge array of program shortcuts and data file icons? Enter the Start Menu shortcut.

Displaying the Start Menu has been simple enough in all versions of Windows since Windows 95 (except for Windows 8, which used a “Start Screen” that behaved differently, but we’ll ignore that for now). Just click your Start button or press the Windows key (the key with the Windows logo on it), and there it is.

Pressing the Windows key also makes the Windows 11 Taskbar appear, if you have yours set to automatically hide itself when you aren’t interacting with it. If you didn’t set your Taskbar to auto-hide, then it’s visible all the time. Either way, this Taskbar functionality is identical to prior versions of Windows, going back all the way to Windows 95. What has changed in Windows 11 is that it’s easier to pin frequently-used icons to the Taskbar that it was in Windows 10 and Windows 8, and that’s what today’s Windows Wednesdays installment is all about.

The steps for pinning an icon to the Taskbar vary, depending on where you find the icon. For example, if you find the icon in the All Apps list…

… then right-click on the program icon you want to pin (Audacity, in this example)…

… then click on More, which displays a fly-out menu …

… and, finally, click on “Pin to taskbar”. Your icon is now pinned to the Taskbar, as shown here:

It’s actually a little easier to pin an icon from Windows Search. Click the Start button or press the Windows key on your keyboard to display the Start menu.

Then begin typing. Optionally, you can click first in the “Type here to search” field, but if you don’t, Windows will know to send your keystrokes to that field. In this example, we’re searching for Audacity. As indicated by the gray characters at the end of the word in the “Type here to search” field, as shown below, even before we finish typing the name of the program, Windows has already made a good guess as to what we want!

Now, right-click on Audacity from the search hits, and “Pin to Taskbar” appears in the context menu, as shown below. Just click “Pin to Taskbar” to finish up.

It’s easier still to pin an icon that’s currently on the Start Menu. But why would I want to do that? After all, both the Taskbar and the Start Menu are prime real estate in Windows 11, aren’t they? The most logical reason to pin something that’s already on the Start Menu to the Taskbar would be as the first step in moving it from the Start Menu to the Taskbar. I would only do this for an icon that I use very often, so often that I don’t even want to have to click the Start button to get to it.

Calculator is an app that I use often enough that might want to move to the Taskbar, so I’ll use that as an example. First, click the Start button.

Next, right-click on the Calculator icon.

Finally, click “Pin to Taskbar” from the context menu.

That’s all there is to it.

There are still more “Pin to Taskbar” instances I could show you, such as pinning an icon from File Explorer or from the Desktop, but this is already a very long post, so I think I will save those for later installments about managing the Start Menu and changes to File Explorer.

IE is Finally Gone in Windows 11… Or Is It?

Unless you’ve been living under a rock for the last few years, you know that Microsoft has been telling everyone that Internet Explorer, the web browser that everyone seems to love to hate, but that nevertheless was the de facto standard web browser for nearly 20 years, is dead, gone, over and done with. Since 2016, Microsoft has been telling developers, including holdouts like those working for governments and large corporate intranets, to find themselves a new standard browser. Since its initial version of Microsoft Edge proved unsuitable as a replacement for Internet Explorer (meaning it didn’t support all the web technologies that Internet Explorer did), Microsoft announced a new Edge based on open source Chromium in 2018, developed it over the course of 2019 and released it in mid-January, 2020. At some point, an Internet Explorer Compatibility Mode was added to Edge, and now Microsoft is again touting Edge as a replacement for Internet Explorer. (I’ve used Edge in Internet Explorer Compatibility Mode for things that previously only worked in IE, including an Exchange Server 2013 Administration Console and several government sites, and it works.) And for the last year or so, Microsoft has been saying that Internet Explorer will be disappearing from desktop versions of Windows in the near future. Did Microsoft make good on this threat/promise in Windows 11. Let’s find out.

When we open Windows 11’s list of all programs (click the Start button, then the small All Apps button towards the upper right), we see in short order that Internet Explorer is, indeed, missing:

IS is not in Win11's All Apps

Since there’s nothing unusual about software failing to appear in Windows’ (any version) list of all programs, though, let’s try a search:

IS Doesn't Appear in Program Search

Nope, no Internet Explorer here; just offers to extend the search to the Internet. How about if we check Settings / Apps & Features?

IE is not in Apps & Features

So, it would seem that as far as Windows 11 is concerned, Internet Explorer is not installed. But just to be thorough, let’s check the legacy Programs and Features from the legacy Control Panel. (Clicking start and the either searching for Control Panel or appwiz.cpl gets us there.)

IE is not in Programs and Features

But wait… in previous versions of Windows, you could install or uninstall Internet Explorer by clicking on “Turn Windows features on or off” from here. Let’s try that:

IE is not in Windows Features

Wow, it sure looks like after all these years, the ol’ buzzard is finally gone, doesn’t it? But just for kicks and giggles, I opened up File Explorer and took a look behind the scenes, in C:\Program Files, and look what I found:

IE is in Program Files

Why, those look like the Internet Explorer executable files, right where they’ve been since Windows XP! So it would seem that Internet Explorer is not quite as gone as I originally thought. But when I double-click the main executable file, iexplorer.exe, something very interesting happens: instead of the familiar Internet Explorer web browser opening up, all I get is a new tab in Microsoft Edge. Now, if we look back at the file listing above, we see another curiosity: File Explorer reports that iexplore.exe file was last modified on 10/21/2021, which happens to be the day that I installed my Windows 11 upgrade. When I look at the same folder on my desktop PC, which runs the latest build of Windows 10, iexplore.exe has a date of 9/14/2021, which appears to be part of a cumulative update that was installed on 9/15. That’s a newer file than I expected to find, but Internet Explorer opens right up and runs perfectly on my desktop. Microsoft announced some time ago that at some point, they would make Internet Explorer redirect to Microsoft Edge, and it appears that in Windows 11, they have done just that.

My laptop came with Windows 10 Build 20H2 on it, and I updated it to Build 21H1 before installing Windows 11. Prior to the Windows 11 installation, Internet Explorer most definitely ran. At this time, I don’t know if the legacy Internet Explorer files are used for anything (such as Edge’s IE Compatibility Mode) or if they can be safely deleted; a quick search turned up no information about this. I would be very interested in seeing if a computer with a clean Windows 11 installation, rather than an upgrade, has any legacy Internet Explorer files on it. As of this writing, I have yet to see a clean Windows 11 installation, as I have no compatible computers on which to try one, and I may not see a new computer that shipped with Windows 11 for a month or more. I will have to revisit this in a later post.

Don’t Get Phished While You’re Out Surfing!

A significant chunk of my weekend was spent helping a home client deal with a serious data breach. It’s not clear if they got phished, fell for clickbait that took them to a compromised site or fell prey to some other ploy, but they somehow ran a bit of malicious code that deviously (meaning using methods that go unnoticed by mainstream anti-malware software) dropped the portable version of a popular remote access program on the computer and then set a scheduled task to run it after a period of inactivity, allowing the criminals to look through the files on the computer at will.

This morning, I received an e-mail from PCMag.com that, serendipitously, included an article about how to spot malicious web pages. As much as I enjoy writing about the technological ups and downs that I encounter as an IT consultant, Neil J. Rubenking’s career as an author of technical articles dates back to before my own career began, and he said it better than I ever could. Consider this article a must-read! https://www.pcmag.com/how-to/how-to-avoid-phishing-scams

Finding Stuff in Windows 11

Windows Search

One of the first things you notice when you display the Windows 11 Start Menu is that while it’s still there – unlike Windows 8, where it wasn’t – it’s a departure from Windows 10, which brought back something resembling the venerable Windows 7 Start Menu. Gone are your categories of tiles, and gone, or at least hidden, is the alphabetical list of programs. They’ve been replaced with a collection of pinned apps and a curious section labeled “Recommended”. We will explore those in future posts. Right now, though, a user new to Windows 11 could be forgiven for thinking, “How the $#^@& do I find anything in this new Windows?!” Fortunately, Windows Search is still here, it’s prominently featured (I’ve circled it in the lead screen shot, above), and it’s better than ever.

Windows Search has been around a long time – about 20 years, in fact. It was first added as an optional update in Windows XP, but that early edition of Windows Search was balky, slow, not very effective and tended to cause the whole computer to get sluggish. But with every version of Windows since then, Windows Search has become better and more tightly integrated. Many people never discovered that they could click the Windows 7 Start button, begin typing without pointing the mouse at anything and find menu items, Control Panel applets and software. That was too bad, because it brought much of the power of Windows 7 right to your fingertips. It was invaluable in Windows 8, which had an annoying habit of hiding frequently-used tiles in unintuitive places. I still use the click-Start-and-search trick constantly on my Windows 10 desktop PC, where it does a decent job of finding data files as well as software. My experience with it so far on my laptop suggests that it’s one of the handful of real under-the-hood improvements in Windows 11.

While searching for software this way in Windows 10 is usually faster than scrolling the alphabetical app list in the Start menu when I need a program that isn’t pinned to Start or the Taskbar, I’ve often found that newly installed software can take several days to get indexed by Windows Search, and, some software, particularly infrequently-used programs, just never seems to show up at all. It does a better job of indexing data files that are stored in common locations, such as Documents or Pictures. And depending on how busy the computer is, searches can sometimes take awhile, and occasionally fail. But all this seems to work like clockwork in Windows 11!

Here, I’ve done a search for the Intel Driver & Support Assistant, a program I don’t run frequently from the Start menu. (It auto-launches in the background, and I usually launch it via the Taskbar Notification Area.) By the time I finish typing “intel” I see:

Searching for a program

Similarly, here’s a search for a spare computer parts Excel workbook that I’ve never actually opened on this laptop before. As with the program search, I’m barely done typing the first word of the title when Windows finds it for me:

Searching for a data file

Windows Search in Windows 11 is so good at finding everything you need that you could probably use the new operating system productively without learning how to navigate the new interface at all!

You Can Always Reinstall Your Software… or can you?

One frustration that clients face when recovering from a computer failure or moving to a new computer is reinstalling their productivity software. (Productivity software is the software you use to do your job: for example, Microsoft Office and Adobe Creative Cloud.) This is a minor frustration compared with what it takes to recover data that wasn’t backed up, but it’s still hard to be productive when you have all your data but you’ve lost the software that you use to create and maintain it.

Once software is installed on a computer, the installation source and any license numbers are out of sight, out of mind for most people. Thus, they tend to misplace the files and information they used to install it, despite warnings from software companies to hold onto them. Today, I am going to explain why it’s important to make sure you keep those things safely stored and documented.

Many computer users fail to understand that while data can be easily copied from one computer to another, most software cannot be, at least on Windows computers. Software that runs under Windows typically includes common files that are stored in the Windows folders, other common files that are stored in shared folders within the Program Files or Program Files (x86) folders, configuration files stored in subfolders of the invisible ProgramData folder and the user’s invisible AppData folder, and Windows Registry settings. Because of this, most software made for Windows computers must be properly installed within Windows in order to run. There are utilities that purport to transfer software from one copy of Windows to another, but I’ve never seen one that works well. There is simply no substitute for making sure your installation source and license information are available.

“Just make full image backups!”, I hear some people answer. (A full image backup is a snapshot of absolutely everything stored on a computer, which, when restored, transforms the computer to exactly the way it was at the time the backup was made.) Unfortunately, while this can work around the problem in some cases, it’s not a cure-all. Full image backups take a long time to make, relative to data-only backups, and also consume much larger amounts of storage space. It’s expensive to make and keep full image backups of all your computers locally, and generally impractical to make them online. And restoring a full image backup is really most helpful after you’ve repaired a failed computer. Using them to load up a new computer often results in system instability. (The “restore to dissimilar hardware” feature found in some image backup software is best for restoring a backed up computer temporarily a new computer, just long enough to get everything you need off of it, and then restoring the new computer back to the operating system that came with it.) Full image backups are also not much help when a single program becomes corrupt. Who wants to restore an entire full image backup just to regain access to Adobe Acrobat Pro, for example?

For the installation sources, I recommend using both of the following methods: First, keep any original media, such as CDs, DVDs, USB flash drives and downloaded files. (Downloaded files can be stored on whatever media are most convenient for you.) If the media didn’t come in an easily stored box, folio or envelope labeled with its name and version, then put it in something that can be so labeled. You can designate a drawer, cabinet shelf or box to hold these. Second, for redundancy and convenience, you should also copy your original media. (It’s completely legal to do this for the purpose of making sure you don’t lose your software. It’s only illegal if you share your copies with someone else.) If you have a network server or network attached storage device (NAS), you can create a software installations share on it and copy your installation media to subfolders within that share. Again, be sure that one way or another, you preserve the software titles, versions, system requirements and any special installation instructions for each program.

Similarly, you should keep at least two copies of your license keys on hand. The first should be kept in printed form with your original installation media. For example, if you purchased QuickBooks on CD, be sure you store one copy of the license key for QuickBooks with the CD. For the second copy, I recommend a document or spreadsheet into which you transcribe your license keys — and be sure to double-check your transcriptions. Your document or spreadsheet can be stored with the copies you made of your original installation media for your software.

Nowadays, many software titles are distributed electronically. You purchase the software online, and the company e-mails you the license information and a link to download the installation files. It’s fine to keep track of the license keys by keeping the original e-mails in an easy-to-find folder in your e-mail, if you like. However, the software companies may not keep the installers available for download in perpetuity, so it’s a good idea to keep a copy or two of the downloaded installers.

One final note: Some software, like QuickBooks, is provided to you when you purchase it, and the software company periodically sends out updates for it during its lifecycle. As with original installers, though, the software company may not keep the updates available forever. That can be a problem for software like QuickBooks, in which updates may alter the data files and render them unusable with older builds of the software. So, if the updates are provided via download, it’s a good idea to keep copies of the updates with the original installers. (Some updates are just that – updates – while others are free-standing installers that will install the latest build of a particular program.)

Unfortunately, there are some software packages that download and apply their updates autonomously, without the company providing you a download to install. If you have to reinstall a program like that too long past what the software company considers end-of-life for that program, then you may have no choice but to purchase the latest version. If your company depends on any such software, it’s best to be proactive about making sure you’re always using a supported version, even if that means buying and upgrading to the newest version every few years.

Properly maintaining your software library will make the difference between a smooth computer restoration or replacement, or suffering serious loss of productivity when equipment fails or must be replaced. It makes sense to take care of this before an emergency arises. If you don’t feel up to doing it yourself, then please don’t hesitate to hire Lebowitz IT Services to help you organize your software installers and license keys.

Connecting Windows 11 to WiFi

Windows 11 WiFi Glyph

Windows 11’s user interface changes – dare I call it a face lift? – improves some things, while making (or leaving) other things counter-intuitive. Connecting to a wireless network decidedly falls into the latter category. If you mostly use a computer with a wired connection, or your computer pretty much stays at home, then it may be quite awhile before you notice how this has changed. But if you carry a laptop with you frequently and often have to connect to different wireless networks, you’ll run into confusion pretty quickly.

Please note that this is a “how-to” post, not a troubleshooting post. If you know how to connect to a wifi network with Windows 11 but are having difficulty doing so, then your best bet is to go to our Contact page and request a service call. (Or you could go back to good ol’ Google and keep searching…)

As you can see from the introductory screen shot on this post, the first change to the wi-fi interface is actually a good one. In Windows XP, Vista, 7 and 8, the wi-fi icon in the Taskbar Notification area looked like the cellular signal strength bars that people were used to seeing on their mobile phones. In Windows 10, Microsoft changed that icon to something similar to the wi-fi signal strength indicator seen on Mac computers and smartphones, but they rotated it 45 degrees to the left so it appeared to sit on its side. Since I know of no other milieu in which the wi-fi symbol looks like that, I began describing it to clients as a “quarter of a target”. The symbol for “no connection” was even less intuitive – a line art image of a globe. (There is a subtle difference between the “No Internet” and “No Connection at All” versions of the globe, but most people fail to see it.) Unfortunately, the “no connection” icons haven’t changed noticeably for Windows 11, but the wi-fi connection now looks like the ones found in Mac OS and on most cell phones, with the slice of the target standing on its point, allegedly resembling radio waves coming off of the top of an antenna. I don’t know if the latter interpretation qualifies as intuitive, but at least it’s consistent with other devices now, and thus should be less confusing.

As with Windows 10, when you want to connect Windows 11 to a wireless network, click on the network glyph in the Taskbar Notification Area:

No Connection network glyph

So far, so good, or at least so familiar. Unfortunately, what appears next is not:

Notification area status dialog

The pop-up that appears is actually a combined status dialog box. Starting from the top row, left corner, we have wifi status, Bluetooth status, and the last-used VPN, if any. On the second row, we see Airplane Mode, which toggles all networking on or off; Focus Assist, which we’ll ignore for now (there will be a future blog post on this), and Accessibility, which we will similarly ignore for now. Below that we have a brightness control (if you’re using a laptop or all-in-one with software-controlled brightness) and volume control.

Windows 11 leaves the uninitiated wondering what to do next. The most intuitive thing to do is click on the wifi symbol in the upper left, but all that does is turn the wifi radio off. (Click it again to turn it back on.) What you actually need to do is click on the “>” in the right half of the button with the wifi symbol.

Connect to wifi

Doing that brings up a the familiar list of wireless networks. From this point on, the procedure is the same as in Windows 10: choose the network you want, enter the password when prompted and Windows 11 connects right up.

What’s a Good Brand Of…?

Random tech logos

One of the most common questions people ask me is “What’s a good brand of ______?” You can fill in the blank with whatever technology product you can imagine buying, but my answer is nearly always the same: “There is no good brand of ______. All companies that sell these products make some that I feel comfortable recommending and some that I don’t.” (That answer is not entirely truthful. There are a few manufacturers that make nothing I’m willing to recommend. But I’m not talking about them today.) People don’t like to hear this answer, because it requires them to pay attention to details that they would rather not have to think about. In today’s post, I’m going to tell you why I won’t simply recommend brands when requested. It all comes down to two concepts that I’m sure marketing professionals have more polite phrases for, but I call them Brand Dilution and Brand Prostitution.

Brand Dilution is what happens when a company has a brand that has a reputation for something that people like and respect, but then they begin using that brand to sell products that don’t measure up. For example, in the mid-1980s, Toshiba began producing laptops. Toshiba wasn’t the first company to make laptops, but their laptops were such an improvement on what had been available up to that point that they’re described by many industry pundits as the world’s first mass-market laptops. Toshiba soon earned a reputation for making laptops that were reliably sturdy, powerful, dependable and easier to live with than most others. (Note that we’re talking about a time in which a 16-pound laptop was considered portable, and 45 minutes of runtime per battery charge was considered long!) People came to expect that any laptop bearing the Toshiba brand would be a high-quality laptop.

But after a number of years, Toshiba introduced laptops that were cheaper, both in price and quality. Imagine my surprise the first time I encountered one of those: it was slow to the point of hanging constantly, and it felt downright rickety in my hands. I couldn’t understand why Toshiba would put their highly-respected name on such a piece of junk! The owner of the laptop couldn’t understand it either, and, not surprisingly, that was the last Toshiba branded computer she ever bought. Over time, I learned that if one wanted a high-quality Toshiba laptop, one had to shop for one of their Tecra or Portege models, which could only be found in places where businesses purchased computer equipment, and not in the big-box stores that had become the primary sellers of consumer electronics. But to people who don’t buy computer equipment on a regular basis, that distinction is invisible. It didn’t take long before most people came to regard Toshiba laptops as junk, and eschewed them in favor of other brands. It didn’t take the big-box retailers much longer than that to realize they weren’t selling many Toshiba laptops, after which they stopped carrying them.

Toshiba never managed to repair their brand image as far as laptops were concerned. They eventually sold off their laptop division to Sharp Corporation, which now produces Satellite Pro, Portege, Tecra and E models under the DynaBook brand. But I have never seen a DynaBook brand laptop in person, and I don’t know where to buy one other than online at the DynaBook web site. (That’s the danger of diluting your brand: you can damage it beyond hope of repair.)

Brand Prostitution is similar, but it happens when a company is indiscriminate about licensing use of their brand name by other companies. The harm to the brand is done when a licensee produces inferior products that are then sold under the brand name, thus compromising the brand’s reputation for high quality. For example, Verbatim was a company that became well-known for producing high-quality diskettes in the 1970s and ’80s, and since then has expanded into other storage products, including recordable CD and DVD blanks as well as flash storage media, like USB flash drives and SD cards. But Verbatim, the company, was acquired by Mitsubishi in 1990, and by 1994, it was nothing more than a brand name owned by Mitsubishi, and, most recently, CMC. Apparently, the brand wasn’t important to Mitsubishi, because they became quite cavalier about the products sold under the Verbatim label. Some Verbatim-branded products are made in factories owned by their parent company, and are excellent. Others are made under license by factories owned by other companies, and the quality, in my experience, is inconsistent. So, if you were to ask me, “Are Verbatim brand USB flash drives good?”, I would have to answer, “I really don’t know. It depends on who made the ones in the package you bought.”

My perception is that both Brand Dilution and Brand Prostitution are common in nearly all market sectors nowadays, and the result is that the consistency of product quality within brands is quite low. That’s why I refuse to make blanket brand recommendations. If I make a product recommendation, it will most likely be for specific models, and then only because my personal experience with those models has been positive.

Adventure of the Week: Unexpected Synergy

Ethernet Jacks

The photo above is of a pair of Ethernet jacks, the kind we see on the backs of desktop computers and don’t really think about unless they mysteriously stop working properly, something they rarely do. That’s not to say that network connections never malfunction; it’s just that when they do, it’s rarely the fault of the network jack in the computer. Today’s tale is about a pair of problems that a client asked me to fix. One was that his network was down, and the other was a computer that wouldn’t boot normally, and those problems turned out to be related in a very unexpected way.

The more pressing issue that the client had was that none of his computers could connect to his network, even though all the cables appeared to be in the right places and all the expected network indicator lights were on or flashing, whichever was appropriate. His ISP had sent a field technician out to look at it, and the technician had concluded that the problem wasn’t with their equipment. This client is fairly tech-savvy, and had spent some time troubleshooting his LAN equipment – which consisted of the ISP’s gateway, a simple, unmanaged network switch and half a dozen CAT8 cables, one connecting the gateway to the switch, and the rest connecting computers to the switch.

No, CAT8 was not a typo. This client is using Category 8 Ethernet cables, which are intended for high-speed, short-range use in data centers and usually not deployed in office settings. This client obviously didn’t read up on IEEE, CCITT and ISO network cabling standards before buying these. But while I conducted some of my tests using a more appropriate CAT6 cable, that was mainly to rule out the idea that unorthodox use of CAT8 might be causing his problems. I was not, in fact, there to troubleshoot the network cables, as they had been in use for quite some time and the problem had only appeared a week or so before my visit.

Naturally, I concentrated my attention on the network switch, which is an unmanaged, 8-port PoE model (although the client doesn’t have any PoE devices). You might ask why I didn’t start with the gateway, which is one of those all-in-one cable modem/router/wifi devices that incorporates a 4-port switch. After all, many cable Internet companies deploy these to their customers, and they’ve been known to cause problems, mainly with VoIP phone service. But this client doesn’t have any VoIP phones, and the one computer that was communicating properly over the network was plugged directly into the gateway, So, the mystery was why the computer plugged directly into the router was working fine, but any computer plugged into the switch either failed to obtain an IP address, or, if it did manage to get a valid TCP/IP setup from the DHCP server (in the gateway), it still could not communicate on the network afterward. So, the logical place to start seemed to be the switch.

The client had a couple of spare network switches, so I tried swapping switches — no change. I checked and re-checked all the connections; again, everything appeared to be hooked up correctly. It made no difference if I connected up using my CAT6 cable or the client’s CAT8 one. If I connected my laptop to the gateway, my laptop got a working connection, but if I plugged into the switch, it didn’t. It seemed unlikely that all three switches were bad, especially since one of which was just a few weeks old.

So, I then turned my attention to the ISP’s gateway. I had never seen that particular model gateway before, so maybe there was some obscure setting in it that had could affect a connected switch and had accidentally been changed. But no matter where I looked in the gateway’s administration GUI, I couldn’t find any settings that might be responsible for causing issues with the switch.

So much for the places where I most often find this sort of trouble. I now had to start looking at the rest of the network. In a typical home or small business network, plugging certain kinds of rogue devices into the switch can bring down the network. Fortunately, this was a small network, and it was pretty much down anyway, so I unplugged all the client’s network cables from the switch, except for the one that connected it to the gateway, and then plugged just my laptop into the switch. Aha, now I was getting somewhere! My laptop was instantly assigned a valid IP configuration and went online.

Next, I began plugging the client’s network cables back in one by one, testing with my laptop after each. Since we’re only talking about four cables, it didn’t take long to find the problematic one. What surprised me, though, is that the cable that brought the network back down turned out to be plugged into the second problem I was asked to fix: the computer that didn’t work.

It’s instructive to note that a modern computer’s Ethernet jack works even if the computer is turned off, as long as a) it’s plugged into a working electrical outlet, b) the power supply is at least working well enough to energize the system board, and c) the Wake-On-LAN setting in the system board’s BIOS hasn’t been turned off. Apparently, this computer’s Ethernet jack was not only energized, but was also transmitting a constant stream of garbage data out over the network cable. That stream was causing the network outage.

The computer turned out to have some strange things about it. First of all, it has two network jacks instead of the usual one. (Two network jacks is quite common when the computer in question is a network server, but this one was a custom-built, but otherwise fairly ordinary, desktop PC, albeit one equipped with high-end components.) One of the jacks was, in fact, connected to the cable from the network switch. The other one was incorrectly connected to a network printer via a standard Ethernet patch cable. I had to explain to the client that such a connection doesn’t work, particularly not without a special crossover cable, and not without at least setting a static IP address on the printer. But even with a crossover cable, such a configuration was unlikely to make the printer work, so I removed the Ethernet cable that had connected the PC directly to the printer.

But could that unworkable connection have caused the network to go down? That seemed unlikely, because, as mentioned earlier, that computer wasn’t working. OK, to be more precise, it wasn’t running an operating system, because, as I would find out later, its power supply was failing. The system board was getting enough power in its off state to energize its Ethernet jacks, but unless there is something very strange about the way those Ethernet jacks were connected to the system board, having a printer improperly plugged into one of them shouldn’t have caused the other one to create problems on the network.

A failing power supply can, theoretically, cause a component like an onboard Ethernet module to fail, but this, too, seemed unlikely under the circumstances. The power supply in the computer was good enough to get the computer through its power-on self-test. It only failed shortly before or after Windows 10 displayed the logon screen, at which point it would shut down.

So, it seemed more likely that the Ethernet jack connected to the (correct) network cable had gone bad. Or maybe the Ethernet adapter circuitry to which that jack is soldered went bad. Either way, moving the network connection to the other Ethernet jack seems to have solved the network problem. Now the client is waiting on a new power supply for that computer.

The moral of the story is that after you’ve eliminated all the common causes for a common problem, be sure to investigate the uncommon causes before giving up.